I asked Ben Dean what tool he used to make the asynchronous import diagram in a recent internal blog post. MS-Paint?! (Never mind that that’s the tool I use too!) We had a brief discussion about some tricks of the trade for making graphics look good using MS-Paint*:
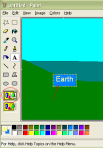
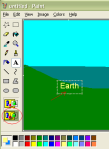
- Use transparent background mode: I usually use transparent (rather than the default, opaque) background mode, and it sounds like Ben does too. In transparent background mode, parts of the copied area that are the color of the background do not overwrite the pasted-to area: This is usually the behavior I want. See the difference:
 vs.
vs. 
- Remember that you can drag text: When you use the Text tool, you can drag the text box around. You click on the dotted line around the perimeter of the text box (but not on the squares that let you resize the text box) and drag the box to where you want it to be. (I didn’t know about this until I spoke with Ben. This will be a timesaver!) The text is no longer draggable once you click off of the text box and make the text part of the drawing.
- Use the Select tool with cut-and-paste to rearrange elements: Once you draw a line or finish placing text and click off of it, the addition is not an independently movable object — it just becomes more dots on the drawing. To move elements around, use the Select tool
 and select a rectangle, then cut it (Ctrl+X) and paste it back into the drawing. Once it’s pasted in, it appears in the upper left of the view and you can drag it to its new location.
 - Remember the free-form select tool: If you want to move a non-rectangular shape that is nestled in amongst other things, you can use the free-form select tool
 to outline just the part you want to perform the cut operation on.
 - Copy-and-paste for accuracy and consistency: To create parallel angled lines, for instance, you can copy the first line and then paste it back into the drawing to form the second line. This is easier and more accurate than drawing the two angled lines freehand.
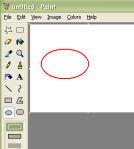
- Select line width using the Line tool for thicker lines when using other shape-drawing tools. A shape tool I use often when marking up screenshots is the Ellipse tool. I set the foreground color to red and “circle” the area I want to draw attention to. The tool is so handy, but I’ve thought I was limited to the thin line width, which doesn’t always show up well. Ben showed me that by selecting the Line tool first, then choosing a different line width:

Now you can select the Ellipse (or Rectangle… etc.) tool and it will draw using the wider line width:

Update: Added item #6.
*The title of this post: kind of joking, but not really!

I’d like your suggestions on drawing web comics using MS paint.Also,I’d like your comment on my drawings in my blog mitchy39.blogspot.com/ and if you have time,your recommendations
it help me a lot in my teaching. my pupils are able to recognize the uses of windows paint as a drawing tool. they also know now how to drag and manipulate the mouse for hands on drawing..:D